Welcome back to the BowTiedGasMask substack and home of the Hard to Kill IFAK!
Someone plugged you with a 9mm, cut you up with a switch blade, or maybe like my wife’s grandpa you reached up under your brush hog before the blade quit spinning.
You’re leaking bad and you need it to stop.
Let us shill for a little bit.
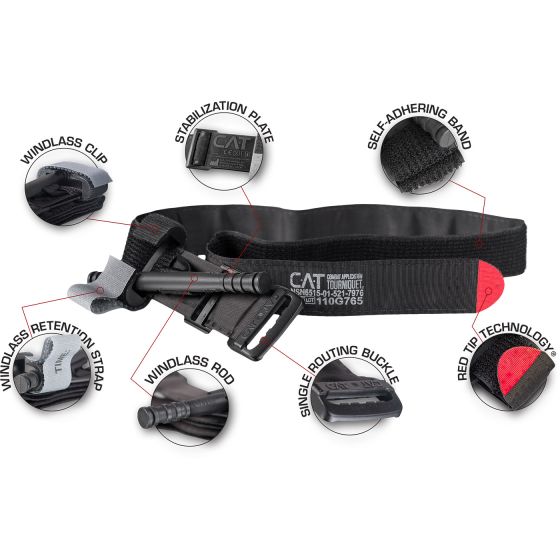
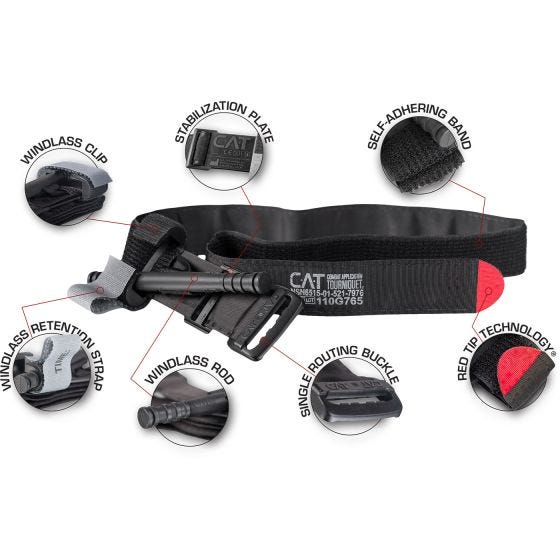
We run authentic NAR CAT Gen 7 tourniquets in our kits.
Why though?
A few reasons
-
Quality - NAR CAT’s are known for superior quality. If you need one, chance are you are f*cked up and need emergency services. The last thing you want is to reach into your trauma kit, pull out the TQ, put it on, crank it down and the windlass snap… (ALSO - BE CAREFUL OF KNOCKOFFS)
-
Familiarity - Let’s say someone is having to put it on for you. The last thing you want is a less common TQ that someone doesn’t know how to use. This is why we avoid RATS. Not because they don’t work for blood occlusion, they just don’t have the same reach as NAR’s do and thus people don’t know how to apply them.
But why take our word for it? Follow link below from the CoTCCC.
So, let’s get down to bidness.
Tourniquet Application: A life saving guide in a traumatic event
In emergency situations where rapid response is paramount, the application of a tourniquet is a life-saving skill. Whether on a wilderness adventure, a first responder scenario, or any situation where severe bleeding occurs, knowing how to properly apply a tourniquet is crucial. Let’s explore the step-by-step process of tourniquet application and the essential considerations for effective first aid.
(NOT PROFESSIONAL OR MEDICAL ADVICE - THIS IS AN ANONYMOUS BOWTIED CARTOON ACCOUNT)
1. Assess the Situation: Safety First
Before attempting to apply a tourniquet, ensure the safety of yourself and others. Assess the situation for potential dangers, and if possible, call 911. If the situation is manageable and immediate action is required, proceed with caution. The last thing you want it is to be in the same situation the person you are trying to help is in.
Calm + Controlled = FAST.
Know what is happening around you before you rush in to save the day. I have nerve damage in my face from my time as a bouncer. Was too in a hurry to handle business that I never saw the guy that snuck me. Woke up and picked my head up and I was looking over the top of my left eyebrow.
2. Locate the Bleeding Site: Identify the Source
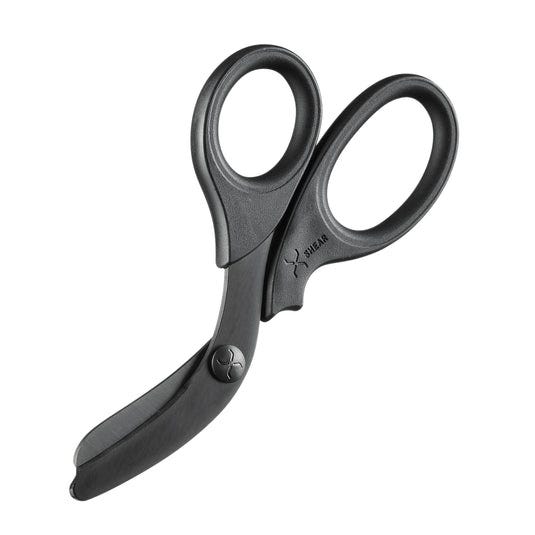
Identifying the source of bleeding is critical. Pretty obvious but if this is an artery bleed, there is going to be blood everywhere. Look for visible wounds or areas where blood is pooling. You need TRAUMA SHEARS. These are used to quickly cut away clothing so you can find the wound and also get the clothing out of the way so you can work. We carry great quality shears in our kit.
We are also big fans of the Trauma X Shear, especially if you plan on using these a lot. The owner is a solid dude, and his shears are supreme.
3. Select the Right Tourniquet: Choose Wisely
Yep, NAR CAT GEN 7.
Where can you find those? In the H2K IFAK!
4. Position the Tourniquet: Proximity to the Wound
First, tourniquets only go on ARMS and LEGS.
Do not use a tourniquet on a neck wound…
Do not use a tourniquet on a head wound…
Now, where in proximity to the wound should you place them? This can become a point of controversy and we aren’t going to wade into it. Some folks say as high up as the armpit or groin. Some folks would tell you 2-3 inches above the wound. Here is the reoccurring theme. ALWAYS above the wound (DUH).
The goal is to restrict blood flow to the injured area effectively and you can only do that by placing it above the wound, as long as your 2-3 inches above you should be fine.
5. Tighten Firmly: Adequate Pressure
We will write a later blog about staging a TQ for rapid deployment that makes life easier. But here are the basics.
-
The TQ self-adhering band goes around the extremity and feeds through the routing buckle to form a loop.
-
THIS IS IMPORTANT. Pull the band as hard as you can and secure it onto itself using the Velcro backing. If you don’t follow this step, you will not create the tension you need in the next step.
-
Turn the windlass rod to create more pressure. Turn it until the bleeding stops and you feel no pulse below the TQ.
-
Secure the windlass rod in the windlass clip and secure again with windlass time strap. This keeps the windlass from coming out accidentally and losing all the tension you worked for. No pressure = no blood occlusion.
-
Document time of TQ placement, if you have a sharpie, on the windlass retention strap. If not, just remember the time so you can tell the emergency responders.
-
Wrap the TQ self-adhering strap back over the windlass strap for added security.
6. Reassess Regularly: Monitor the Situation
After applying the tourniquet, reassess the patient’s condition and monitor for any changes. Check for signs of shock and be prepared to provide additional first aid as needed. Keep the patient as calm and comfortable as possible while awaiting professional medical help. Maybe they are experiencing hypothermia, and you need a mylar blanket? Guess whose kit has one? H2K IFAK!
7. Communicate with Emergency Services: Seek Professional Assistance
While a tourniquet is a powerful tool in controlling bleeding, it is not a substitute for professional medical care. Your job is to stop the bleeding until you can get them to a hospital or emergency services arrives. If you didn’t call 911 before, now is the time.
Safe and effective tourniquet application
In conclusion, the proper application of a tourniquet can be a life-saving intervention in emergency situations. Safety, quick assessment, proper tourniquet selection, precise placement, adequate pressure, secure fastening, regular reassessment, and seeking professional assistance are key steps in this life-saving process. Being equipped with the knowledge and skills to apply a tourniquet effectively can make a significant difference in emergencies, turning a potentially dire situation into one where lives can be saved.
Remember, you can’t use a tool you don’t have. Pick up an IFAK and familiarize yourself with it.
Practice. Practice, Practice.
You don’t want to dry run this while trying to help someone you love survive an accident.
Thanks for reading! We hope we have been helpful.
We can’t do this without you.
If you don’t have out kit, pick one up NOW. No one thinks it will happen to them…then it does, and they are unprepared. Don’t reach for this kit when you need it and find the $90 you weren’t willing to spend instead. We have 100% 5-star reviews since launch.
Tell your friends and family about us. Our kits make great gifts for anyone who values their safety. They are great for cars, ruck sacks, and battle belts.
Our blog is geared towards LT/ST food storage and post pandemic rational prepping. We have also been working on a series that features Hard to Kill MFers. Consider subscribing to our stack for more content like this!


